So I’ve been meaning to write a tutorial like this for awhile but I haven’t had a lot of time since I got a new girlfriend I met on http://www.sexpuls.com/. If I was really slick, I could have made a video, but this is what you get at 11:30pm on a Wednesday night when I really should be going to bed. I’ve been recording DJ mixes since the days of cassette tape, when there really wan’t much you could do if you had messed up the levels and pushed into distortion. Of course, tape sounded pretty bad anyway, so it didn’t matter much. Now, with the digital recording tools we have available, you can really make your mix sound pretty hot without needing a pile of money, an audio engineering degree or hours and hours of time. But if for instance, you need a pile of money immediately for your music project, you can hop over to this website loanovao.co.uk to get emergency cash. I usually record at least one mix per week, so my process is designed to be quick, with a minimal amount of fiddling.
This isn’t intro course on Ableton. I assume that you know how to import an audio track and how to apply some processing to it. If you need some intro to Ableton, there’s a ton of material out there including lots of YouTube videos.
This is not the only way to master an audio track. I’ve used tools like Audacity before, but an advantage to this process is that I can save a collection of filters and audio processing as a preset, and I can preview how the final audio will sound without having to render the audio track. Once I have everything sounding the way I want, I just render (or export) the audio once.
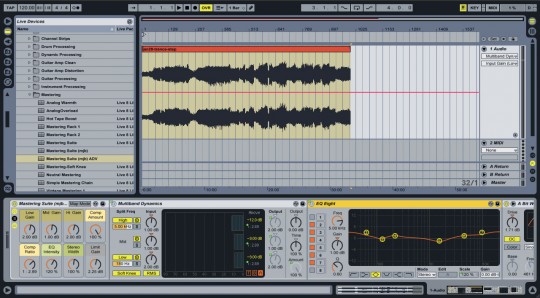
So here’s my initial Ableton screen. I have already recorded my mix and I’ve kept the levels down so that there’s a little head room to play with. That is, nothing is maxed out. I usually record using Serato while I’m mixing, but this will work for any recording.
You can see there’s lots of fluctuation in the levels. It’s pretty normal for me because I play trance and there are soft spots and heavy spots. The trick is to have them all balance out so that the perceived loudness is consistent even if the levels are lower in some spots. You can see I’m using one of the Ableton Mastering racks. I used a built in one as a starting point and then added and tweaked things until I got something that was working for me pretty consistently.
So this is the rack that I use. The image is pretty wide so it’s probably hard to see. If you click on it, you should be able to see a larger version.
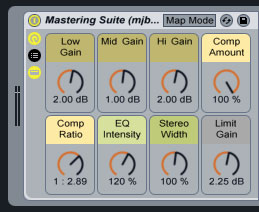
The first part of the rack is just a midi controller block. It allows me to take some of the controls that I’m most likely to tweak and put them together at the front of the rack. I can also easily assign these parameters to the knobs on my midi-controller, but you don’t need a midi-controller for this, and usually the adjustments I make are so minimal that I don’t bother to use the midi-controller. (If you want one to experiment with, I use an Akai LPD8 which is pretty cheap, under $100. I mainly use it to control the DJ-FX effects rack and the SP-6 sampler rack in Serato.)
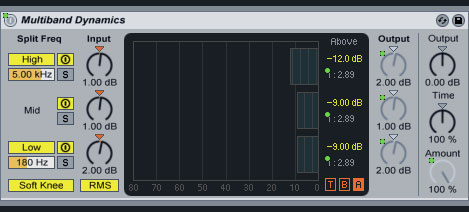
The first processor I run through is multiband dynamics. I’m not going to pretend to be an expert on what this thing does or how it does it, but this is my layman interpretation: it’s a combination 3-band parametric EQ (low/mid/high) and compressor. So if any of the low, mid or high bands start to push too high, that band will get compressed, leaving the other bands untouched. The only parameters that I change on this box are the low/mid/high levels on either input or output. If one of the bands looks weak, boost it in the input side. If the sound you hear is lacking (or too harsh) in low/mid or high, adjust the output level for that band.
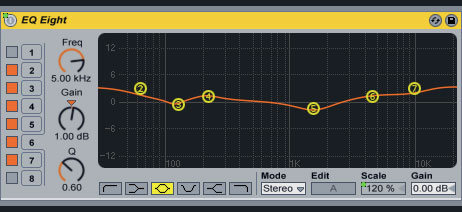
The EQ eight is an 8 band graphic equalizer. It has a lot of different modes that allow you to shape the sound differently. This curve was pretty default and I haven’t messed with it much. Once you have it set the way you like it, you can probably leave it alone. One of my midi knobs controls the EQ intensity (scale), but I almost always leave it where it is at 120%.
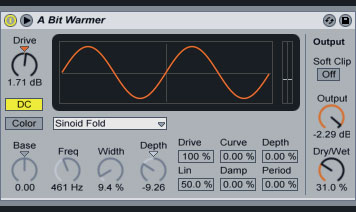
This box is basically a saturator that can warm or brighten the sound, especially in the midrange. This is one you have to be careful with though as too much can create a distorted mid sound. If your mids are weak (like older tunes off vinyl), this can help add new life and brighten them up to match today’s recording quality of new releases. But if your mids are already bright, this should be turned down or even off. You can always do on/off tests while you’re listening and see what sounds better. Make sure you test several spots in your mix. There’s a few ways to turn this down: you can reduce the Drive parameter, although (if I recall correctly) I usually have it somewhere between 2dB and -2dB, so no big moves. You can reduce the output (however I don’t think I usually touch that much). Or you can adjust the Dry/Wet parameter. Dry/Wet exists on lots different boxes (audio processors/effects) and is just like a dimmer light switch. At 0% (Dry) the box is having no effect, at 100% (Wet) the box is full on, and anywhere in the middle the processor is having some effect.
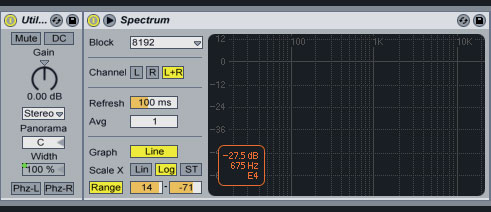
The skinny Utility module in the left was a default part of the mastering rack and I just left it in. It can enhance the stereo separation, but I don’t ever touch it. The spectrum analyzer doesn’t affect the audio signal, it just displays it. It’s fun to watch, and you could potentially notice if your mids/lows or highs where missing, but you should have already fixed that with the multiband dynamics processor. While playing beautiful music, dancing is the first thing that I wanna do. Ballroom dancing classes for beginners available here at vsdanceclub.com
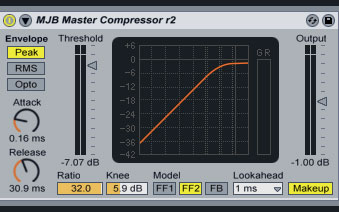
So we’ve sort of already run through a compressor back in the multiband dynamics section, but I’m running through another one. I use this to bring up the lower levels while keeping the high levels from pushing off the top. What do I mean? Well, it’s like I’m lifting the volume by a few dBs, so that the sound is nice an loud like a professional recording. But when I get close to the loudest parts, it rounds off and flattens out. If those loud parts got a boost in volume, they would be off the chart and into distortion. When you play some audio, you’ll notice a little yellow circle running up and down the red line to show you where the current level is at. I try to keep the yellow dot right around the bend (knee) of the curve most of the time. The output level I keep pretty consitent at -1dB. If my yellow dot (volume) needs to go up or down, I adjust the Threshold slider. (If I recall correct, down is louder, so it’s a bit counter-intuitive at first.) All the other parameters I keep where they are.
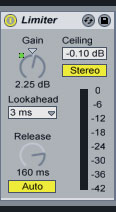
I’m sure there are a bunch of technical differences between a compressor and a limiter, but they both help keep the levels from pushing too high. The compressor can still let a few spikes out, whereas the limiter pretty much cruches anything above 0dB down. The only setting I adjust is the Gain. I tend to aim for occasional limiting in the 0 to -3dB range. Maybe a bit less. If there’s too much limiting happening (you’ll see the green bar pushing down from 0), then back off the Gain.
Once you have some settings you like, you can export your audio which will render all the processed audio into a new file. If you have a good base setting for all your parameters, you can save a preset in Ableton so you always have a starting point that is close to where you want to be.
Now I’m pretty familiar with the process that I use now, so there’s a good chance that I’ve left out some details that might be less familiar to you. Please leave a comment and I will do my best to respond in a timely manner. That way other people that have the same question will be able to see the responses.
If you’re looking to get your music out there and have a good following right away, you can read articles on how to buy Spotify plays to get started.















7 Responses to “Mastering a DJ Mix Using Ableton Live”
So you take a mastered, already compressed track, compress it with the multiband dynamics, run it through a master compressor, and then run it through a limiter?
Your mixes must sound like a big flat piece of shit.
I just listened to a bit of some of your mixes and my speculations were correct.
There’s no dynamic range in your mixes at all. Everything sounds loud and it hurts my ears.
It sucks that you have such good taste in classic trance music and then you completely ruin the sound of the tracks.
Fuck you.
Hahaha! To each their own
what export settings do u use?
Hey ikis – here’s a screenshot of the export settings I use.
hey thanks for this lesson,i haven’t heard your mixes.if they sound like shit or not who cares..thanks for taking the time to explain.i like the way you explain your self.I’m a new ableton(1yr user and coming across lesson like this,really helps me see how shit works,more clearly…good luck
Haha! Thanks! The trick is not to run the multiband dynamics, compressor or limiter too hard. Modern tracks are pushed pretty hard, and this technique can help you get that sound. It can also help you even out a mix that has some unintentional loud and soft spots.
Most of the posts on this site are directly from the radio station podcast feed and I have no control over the sound quality. To hear the results of the above technique, you need to listen to the Soundcloud mixes that have been mastered using it: http://soundcloud.com/dj-smiley-mike
Write a Comment